Bokashi Composting | DIY Bokashi Bin
Bokashi Composting is a Japanese method for composting kitchen scraps. It is a great method for composting all your kitchen scraps in a shorter amount of time while using less space. In this blog post, we will be talking all about what Bokashi Composting is and how to create a DIY Bokashi bin.
First, let’s start with the basics.
What is Bokashi Composting?
Bokashi composting is a method for creating nutrient-rich additions to your garden through the use of fermented kitchen scraps. The word “Bokashi” actually means fermentation.
Bokashi composting is much different as instead of fully decomposing the food scraps we are getting them to a fermented state before using. The fermented food scraps can then be buried in trenches directly into the garden, added to outdoor compost for a boost to your pile, or used to feed worm bins.

Things to Consider Before You Get Started
No matter which route you take in composting, there are some learning curves to ensure your success. For Bokashi composting, you do need to have a few “tools” for this before you can get started. So don’t start collecting those kitchen scraps just yet. The first thing you will need is a bokashi bin either store-bought or homemade.
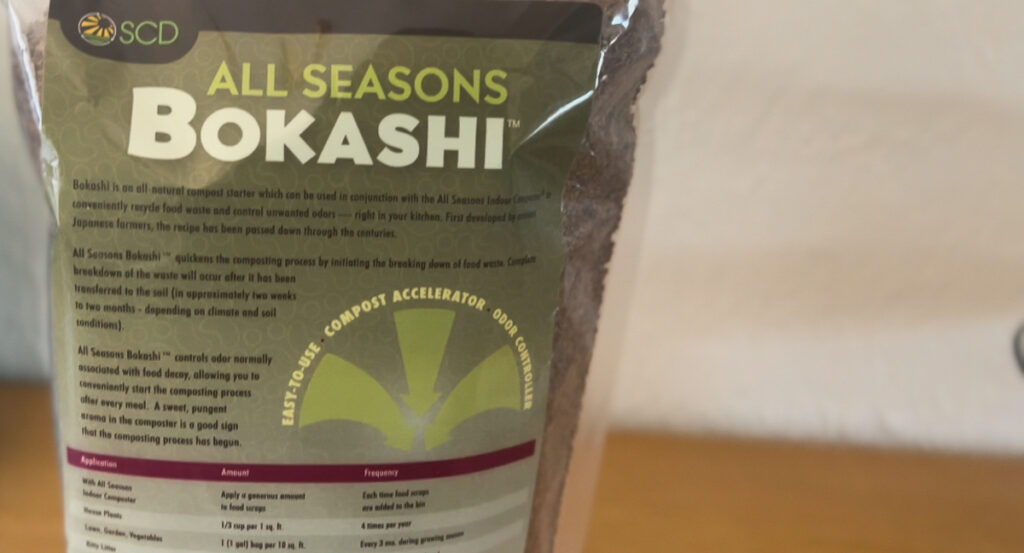
Later in this blog post, I will be sharing my method for making a homemade Bokashi bin. This is more than just using a bucket with a lid as the Bokashi will need to be able to drain off as it sits. You will also need some Bokashi bran to add to the food scraps to help the process along. Bokashi bran is made from organic matter and filled with microbes.
This bran helps to accelerate the bokashi composting process. It is essential for making bokashi compost.
Benefits of Bokashi Composting
Being a gardener and understanding how composting works; it is always hard to toss my kitchen scraps. I have found ways to use my kitchen scraps whether that be for making stock with veggie scraps or putting the coffee grounds at the base of my roses. I also supplement my chicken feed by feeding our chickens scraps from the kitchen.
But even with all these uses, I still find myself with leftover things that go into the trash can. I do have a compost pile outside but I am not able to throw actual food scraps in there due to the pests we have in the area. Even a hot pile, can attract unwanted pests I have found.
If you are concerned with pests, live in a smaller space without room for a traditional compost pile. Or just want another great method for using those kitchen scraps, the Bokashi method is a great option.
Using this method allows you to save otherwise what would be waste and turn it into fermented nutrient-rich plant food for your garden. In addition, the liquid by-product of bokashi composting is another excellent fertilizer for your plants as well. Which you can then add to your watering can.
How To Make Bokashi Compost
Now that you have all the materials and you are ready to begin, let’s cover how to actually do it. First, we will leave our buckets in a handy area, hopefully in the kitchen under the counter, or in a pantry. Just somewhere at room temperature and convenient to grab.
You can opt to have a compost canister on the countertop to collect the scraps throughout the day, then toss them in at night. Or you can add to the bin throughout the day. Each time you add scraps to your bin you will want to cover them with the bokashi bran by sprinkling a spoonful or so on top each time.
It is a good idea to tap down your bokashi scraps with something to make sure there is no air getting trapped in them. A potato masher works great for this. Every few days or so, you should check the liquid in the bottom bucket which is also known as Bokashi tea.
This liquid can be used in the garden. Keep in mind Bokashi tea is quite acidic so it should be watered down quite a bit before adding it to the garden. After your Bokashi bucket is filled, you can add a bit more bran to the top, and tap it down to make sure it’s all compact. Then place the lid back on and allow it to sit at room temperature for 2 weeks.
Be sure to drain off the bokashi tea as needed. After 2 weeks, your bokashi compost is ready to use.
What Can Go in Bokashi Compost?
You can put egg shells, coffee grounds with filters, and veggie or fruit scraps. Unlike traditional composting, you can also add meats, dairy, house plant clippings, and leftovers from dinner you name it. You can even put bones into the Bokashi compost bin.
However, keep in mind that they take a very long time to break down. So unless you don’t mind digging up bones accidentally in your garden from time to time feel free to place them in there. I don’t want to sift through bones and so I use mine for bone broth and then toss it after. But it is a preference on that.
DIY Bokashi Composting Bin
What You Will Need:
2- 5 gallon buckets
1 air tight lid
drill with a thin drill bit
Directions
Begin by making sure you use a drill bit that is fairly thin. You don’t want the food to escape through the holes. I used a 3/32 bit for mine. Turn one bucket over and drill about 16-20 holes making sure the holes are evenly drilled along the bottom. This way none of the liquids will get trapped on either side of the bokashi bin. Place the drilled Bokashi bin inside the other bucket, and place the lid on.

Your Bokashi bucket is ready to use. Be sure to have Bokashi bran on hand before beginning. Keep in mind that once the bucket is filled. You will need to seal it for 2 weeks before the scraps are ready. It is a good idea to make two bokashi bins so that you can rotate them out between filling up and sitting.

Shop This Post
Bokashi Composting Starter Kit
Pin For Later
Check Out More Favorites From The Farmhouse!
How to Save Seeds from the Garden
5 Easy Flowers to Grow for a Cut Flower Garden
DIY Garden Trellis for Climbing Plants
*Disclaimer: This post may contain affiliate links, which means I may receive commissions if you choose to purchase through the links I provide (at no cost to you).


